Do you get annoyed by some random hindrance in your viewing experience? Especially when that “VISUAL” is your projectors big screen. Such a common issue comes forward as the projector light bleed. It is a plight when your projector screen causes issues, rather becomes a big hurdle in your optimal viewing. Now this, light bleed in home theaters reduces the immersive experience, especially in dimly lit scenes. It may also warp color accuracy, which detracts from the aesthetic attractiveness. Sometimes, incorrectly configured projector settings can lead to light bleed or a halo effect. Hence solve these issues, it is crucial to utilize a high-quality screen and ensure the projector is aligned correctly. Moreover, these include changing the room’s conditions, modifying the projector’s settings, and purchasing higher-quality projector screens. You can also turn off geometric correction entirely to fix it.
Now, if you’re wondering what light bleed actually is, let us first see what this major screen problem is.
What is a Projector Light Bleed?
Imagine you’re sitting in your living room and watching your favorite movie, but all of a sudden you look at your projector screen and there’s a slight dispersion of light around the edges; Yes, don’t get scared that is what light bleed is. Kind of like an overflow of light. Especially, an incorrectly configured projector settings can lead to this problem. When light from a projector spill over into the designated screen area, it causes the projector light to bleed, which blurs and softens images. This problem is most apparent in scenarios with lower light levels, as undesired light either leaks through the screen or produces a halo effect. Lens aberrations, projector positioning, and ambient illumination are contributing variables. This backlight bleeding occurs or light leakage hampered the viewing experience since it reduced immersion and contrast.
- Screen Light Bleed: When light seeps past the edges of the screen, the clarity of the image is affected.
- Backlight Bleeding: It’s a unique to LCD panels in which light leaks around the screen’s edges.
How to Identify Projector Screen Bleed?
Do you know how you can identify the screen light bleed? Let’s take a look.
Test for Light Bleeding
Project dark images to detect unwanted light leaking around edges or corners.
- Black Image Test: Project a fully black image and look for light leaks at the edges or corners, which indicate areas of light bleed.
- High-Contrast Test: Use a dark, high-contrast image to see if light bleed affects image clarity or quality.
Monitor for Color Bleeding
Use vibrant colors to check for color mixing issues or misalignment that affect image accuracy.
- Color Check: Project various colored images to identify any unwanted color blending.
- Also to avoid misalignment issues that could impact screen quality.
Examine the Environment
In a fully dark room, inspect for bright spots or halos to highlight light bleed.
- Dark Room Setup: Test the projector in a pitch-black room.
- Look for bright spots or glowing halos that reveal light bleed.
Compare Different Content
Switch between various content types; consistent bleed across content signals an ongoing issue.
- Content Variety: Switch between images, text, and videos.
- Persistent light bleed across different types of content indicates a consistent problem with the projector or screen.
These procedures will help you locate and deal with projector screen bleed appropriately.
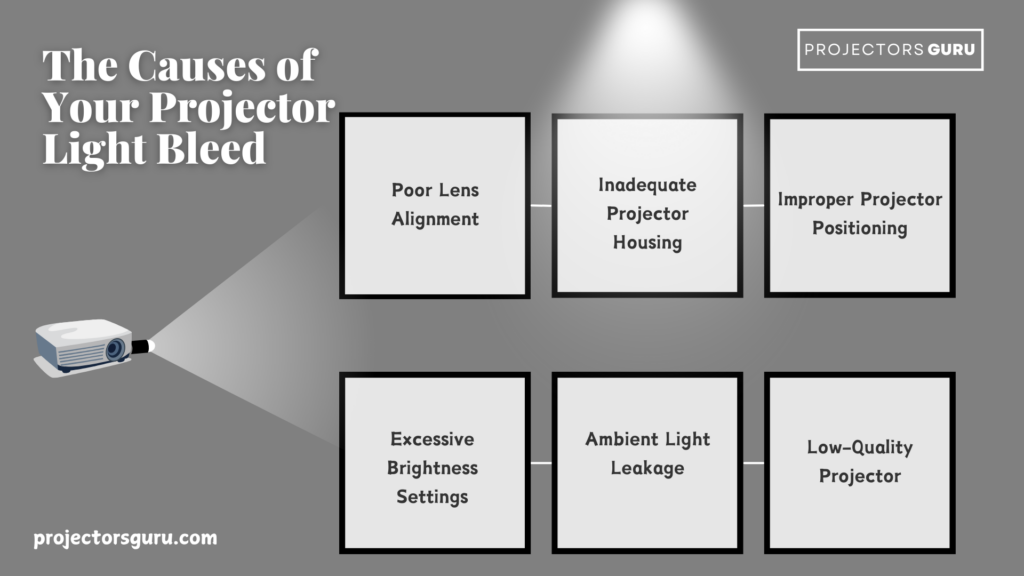
Causes of Screen Light Bleeding
Here is the actual mystery and causes behind the projector light bleed.
Features of LCD Panels
LCD screens may experience light bleed due to backlighting methods, especially around the edges.
- Screen Design: LCD screens’ backlighting methods sometimes cause a light bleed. Light leakage along the screen’s margins could result in a noticeable bleed.
- Backlight Bleeding: Light might seep through unexpected places due to unevenly placed backlight.
Screen Content and Caliber
Low-quality screens struggle to hide light effectively, making bleed more noticeable.
- Screen Brightness: Poor-quality screens cannot hide light well enough, making bleeding more obvious.
- Light Absorption: Poorly absorbing screens let more light through, worsening the issue.
Setup of the Projector and Screen
Misalignment or improper installation of the screen can cause light to leak around its edges.
- Screen Edges: Light leaking around the edges of the screen may be caused by misalignment or poor installation.
- Projector Light: The amount of light bleed can be affected by the projector light’s intensity and angle.
Lighting Specifications
Light bleed is more noticeable in dark environments or with excessive ambient light.
- Dark Environment: Light bleed is more apparent in dark situations with solid contrast to the projected image.
- Ambient Light: Too much ambient light can make light bleed more visible.
The Effects of Bleeding Light
Light bleed in a projector can certainly leave several issues. Here is a glimpse of them.
Decreased Image Clarity
Light bleed can dramatically reduce your screen’s clarity. When light leaks into areas it shouldn’t, the overall sharpness of the image diminishes, and the edges are blurred.
- The edges of the image are blurry.
- It diminished clarity and precision.
- They compromised the accuracy of the image.
Uninterrupted Visual Experience
Unwanted light can distract viewers and detract from the immersive experience. Concentrating on the topic may be challenging due to this distraction.
- Decreased interest in the material.
- Regular disruptions in vision.
- Reduced interest from viewers.
Inconsistent Brightness
Uneven brightness caused by light bleed might ruin the visual appeal. Different screen brightness levels result in an inconsistent viewing experience.
- Uneven luminosities.
- Visually distracting disparities.
- They changed how people perceived the content.
Some Case Studies
Examining case studies on projector light bleed shows how top manufacturers have handled this prevalent problem in different contexts, including Sony, Epson, BenQ, Optoma, and LG. These case studies offer valuable insights into the difficulties and fixes found in actual situations, including;
- Contrast Reduction: Businesses have implemented particular procedures to reduce contrast reduction caused by light bleed and improve overall image quality.
- Color Inconsistencies: Color shifts can be fixed, and accurate color representation can be maintained in various settings.
- Distorted Aspect Ratios: To guarantee correct picture alignment, manufacturers have addressed problems with distorted aspect ratios caused by light bleed.
These case studies cover a range of settings, including outdoor movie theaters, corporate boardrooms, and home theaters, and they provide insightful advice on identifying and resolving light bleeds. For the most recent tactics and solutions, visit official websites, trade forums, and trade periodicals.
The Solutions to Fix the Light Bleed
Let’s finally head towards the solution to this misery and fix the projector light bleed.
Adjusting Projector Settings
Reducing projector brightness helps minimize light leaks.
- Screen Brightness: To lessen light leaks, turn down the brightness on your projector.
- Projector Positioning: To prevent light leakage around the corners, align the projector correctly with the screen.
Upgrading Screen Material
Choose high-quality, light-absorbing screens to reduce light bleed.
- High-Quality Screens: Select a projector screen with excellent light-absorbing materials to reduce light bleed. You can also search for some online.
- Screen Replacement: Swap out your old screen for one made primarily to address light bleed problems.
Improving Environment
Lowering ambient light levels or using ambient light rejecting screens reduces contrast issues.
- Ambient Light: Lower the ambient light level in the viewing area to lessen the contrast between the screen and its surroundings. You can also install the ambient light rejecting screen.
- Employ Light-Absorbing Materials: Add materials around the screen to reduce reflections and absorb light.
Screen Calibration
Professional calibration ensures optimal performance and minimal light leakage.
- Professional Calibration: Hire an expert to calibrate your screen and projector to ensure maximum efficiency and the lowest light leakage.
The PRO Tips
Tackling projector light bleed requires a mix of expert techniques, tools, and upkeep. Here’s how professionals handle it;
- Use Calibration Tools: Colorimeters or spectroradiometers accurately measure and adjust color and light output for better performance.
- Consult Experts: AV consultants or calibration pros provide tailored solutions for complex projector setups.
- Prioritize Maintenance: Clean lenses and internals regularly to prevent dust buildup that worsens light bleed.
Mastering light bleed means combining knowledge with the right tools and consistent care; your setup will thank you!
Final Thoughts
Summing up, projector light bleed, also known as screen light bleeding, screen leaking, can taint the quality of your image and color reproduction, ruining your watching experience. It’s essential to recognize its origins, including subpar liquid crystal display panels, insufficient screen materials, or incorrect lighting conditions. To identify problems, check your projected images and run a light bleed test. Consider switching to high-quality projector screens, enhancing light absorbing quality, and arranging your viewing space to help prevent backlight bleeding and light leakage.In conclusion, you can significantly minimise light bleed and improve your projector experience by taking care of these things, guaranteeing a sharper and more colorful image every time.
ENJOY VISUALS FREE OF LIGHT BLEED!
FAQ’s
A: Unwanted light spilling beyond the screen area, reducing image clarity.
A: Yes! Use calibration tools, adjust settings, or clean the lens.
A: For tough issues, AV consultants or projector experts can provide tailored solutions.
A: Big time! Dark walls and ceilings reduce reflections.
A: Absolutely! A dark-bordered screen minimizes light distractions.


